Microsoft Sharepoint Adapter
Installation
These installation instructions will demonstrate how to configure Kinetic Calendar to connect to and display Microsoft Sharepoint calendars.
Assumptions
We'll be showing how to add the Kinetic Sharepoint Adapter to an existing Calendar 2.0.3.installation. The Sharepoint adapter requires at least Calendar 2.0; version 2.0.3 is highly recommended.
Requirements
The adapter requires two new jar files.
- kinetic-calendar-sharepoint-adapter.jar (the adapter itself)
- kinetic_wsc.jar (the web services interface to Sharepoint)
The jars can be found in the zip file, sharepoint_0.7.1.zip.
In addition, you can download and edit these new configuration files.
[web_server]\webapps\kineticCalendar\WEB-INF\configuration\calendars\sharepoint_sample**calendar.json
[web_server]\webapps\kineticCalendar\WEB-INF\configuration\calendars\sharepoint_sample**et_events.json
These configuration files can be found in the file sharepoint_sample.zip.
You will need to know the URL to your local Sharepoint Server's "List" Web Service. Usually, this URL will look something like:
http://sharepoint.superhappy.com/_vti_bin/Lists.asmx
Step 1: Stop the web server
Step 2: Copy the jars
Copy kinetic-calendar-sharepoint-adapter.jar and kinetic-ews.jar and paste them into the lib directory (kineticCalendar\WEB-INF\lib).
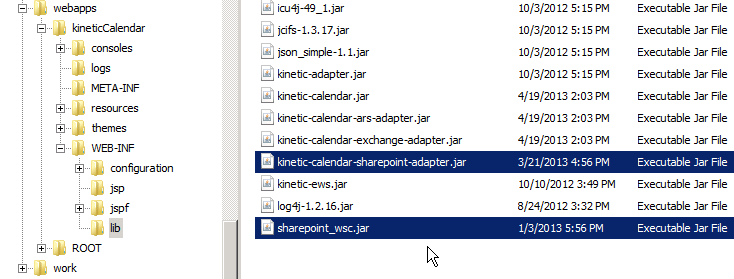
Step 3: Edit the adapter configuration file
With a text editor, open the configuration file for Kinetic Calendar adapters (kineticCalendar\WEB-INF\lib**adapters.json**). Before you make any changes, make a copy of the file for safekeeping. Out of the box, the file looks like this:
[
"com.kineticdata.calendar.adapters.ars.ArsAdapter",
"com.kineticdata.calendar.adapters.exchange.ExchangeAdapter"
]
Add a comma after the Exchange adapter line, and add a reference to the Sharepoint adapter. The result should look like this:
[
"com.kineticdata.calendar.adapters.ars.ArsAdapter",
"com.kineticdata.calendar.adapters.exchange.ExchangeAdapter",
"com.kineticdata.calendar.adapters.sharepoint.SharepointAdapter"
]
Step 4: Create the specific calendar config files
You can use the configuration files in sharepoint_sample.zip as a guide.
Create a folder under kineticCalendar\WEB-INF\calendars called sharepoint_sample.
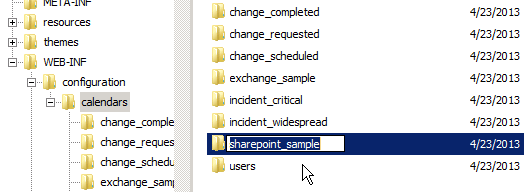
Inside the new folder, create a file named calendar.json. Paste this text into the file:
{
    "name": "Sharepoint",
    "id": "sharepoint",
    "description": "A sample calendar for Microsoft Sharepoint.",
    "status": "Active",
    "defaultView": "Month",
    "displayPage": "/themes/default/calendar.jsp",
    "fixedTimezone": null,
    "visibleInListing": true,
    "clickHandler": {}
}
Create a new file named et_events.json. Paste this text into the file:
{
    "name": "CalendarItems",
    "status": "Active",
    "defaultFilter": "",
    "detailsPage": "/themes/default/event.jsp",
    "color": null,
    "displayOnLoad": true,
    "source": {
        "connectionName": "Sharepoint Server",
        "configuration": {
            "Calendar Name": "Calendar"
        },
        "detailMappings": {
            "Location": "{{Location}}",
            "Category": "{{Category}}",
            "Event Type": "{{EventType}}",
            "Recurring": "{{fRecurrence}}",
            "Created Date": "{{Created}}",
            "Modified Date": "{{Modified}}"
        },
        "filterMappings": []
    }
}
Step 5: Restart the web server
Step 6: Configure the connection to Sharepoint
Open the adminstrator console for calendar. The URL will be something like this:
http://localhost:8080/kineticCalendar/AdminConsole
Click on New Connection button above the list of Connections.

In the New Connection window, you'll be asked which adapter class to use.
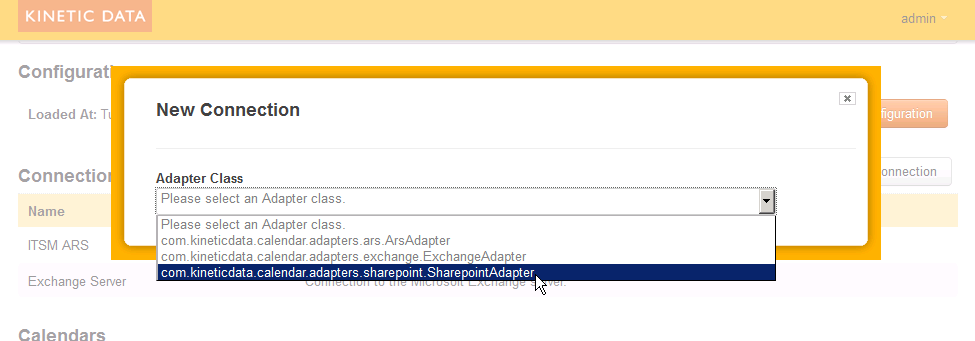
Once you've picked the class, the Edit Connection dialog window appears.
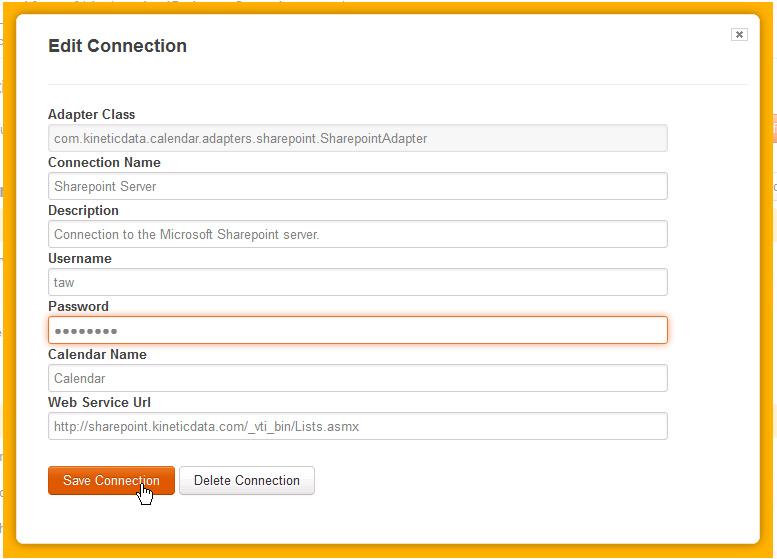
- The Connection Name you give here will be the connectionName you define in any related et_events.json configuration files.
- The Description can be anything you like.
- The Username and Password represent the account credentials for logging into Sharepoint.
- The Calendar Name is any calendar you have access to. The connection process will use this calendar to verify your connection to the Sharepoint Server.
- The Web Service Url is the path the Lists Web Service on your Sharepoint Server.
You've probably noticed there is a Calendar Name configuration item in the et_events.json file as well as in connections.json. This apparent redundancy arises from the way the adapter verifies its connection to the Sharepoint Server. At start-up, the adapter tries to connect to the calendar named in connections.json (typically: "Calendar"). Thereafter, you can show any calendar that you can access by means of the Calendar Name in et_events.json.
Step 7: Test the Connection
Once you've saved the connection configuration, your new calendar (the sharepoint_sample you created in Step 4) will appear in the list of Calendars below the Connections. Click on the Name.

A new browser tab should open and present you with a Kinetic Calendar.

Step 8: Add another Sharepoint calendar for viewing
- Create a new folder under kineticCalendar\WEB-INF\configuration\calendars (e.g., sharepoint_[calendar_name])
- Copy the calendar.json and et_events.json file from the sharepoint_sample folder into the new folder.
- Edit the et_events.json file. Under "source" --> "configuration", enter the "Calendar Name." For example, if the calendar's name is "Bar":
{
    "name": "CalendarItems",
    "status": "Active",
    "defaultFilter": "",
    "detailsPage": "/themes/default/event.jsp",
    "color": null,
    "displayOnLoad": true,
    "source": {
        "connectionName": "Sharepoint Server",
        "configuration": {
            "Calendar Name": "Bar"
        },
        "detailMappings": {
            "Location": "{{Location}}",
            "Category": "{{Category}}",
            "Event Type": "{{EventType}}",
            "Recurring": "{{fRecurrence}}",
            "Created Date": "{{Created}}",
            "Modified Date": "{{Modified}}"
        },
        "filterMappings": []
    }
}- Edit the calendar.json file to change the title in the Calender view in Kinetic Calendar. Give it a unique ID. (Every calendar you show must have a unique "id".) For examle, if you want the title of the Kinetic Calendar to be "Calendar (Bar)":
{
    "name": "Sharepoint (Bar)",
    "id": "sharepoint_bar",
    "description": "A Microsoft Sharepoint calendar named Bar.",
    "status": "Active",
    "defaultView": "Month",
    "displayPage": "/themes/default/calendar.jsp",
    "fixedTimezone": null,
    "visibleInListing": true,
    "clickHandler": {}
}
Step 9: Reload the configuration
You have to click the Reload Configuration button or restart Tomcat (or whatever your web server is) in order for Kinetic Calendar to notice that you've updated the calendar configuration folders.

Step 10: Test your new calendar
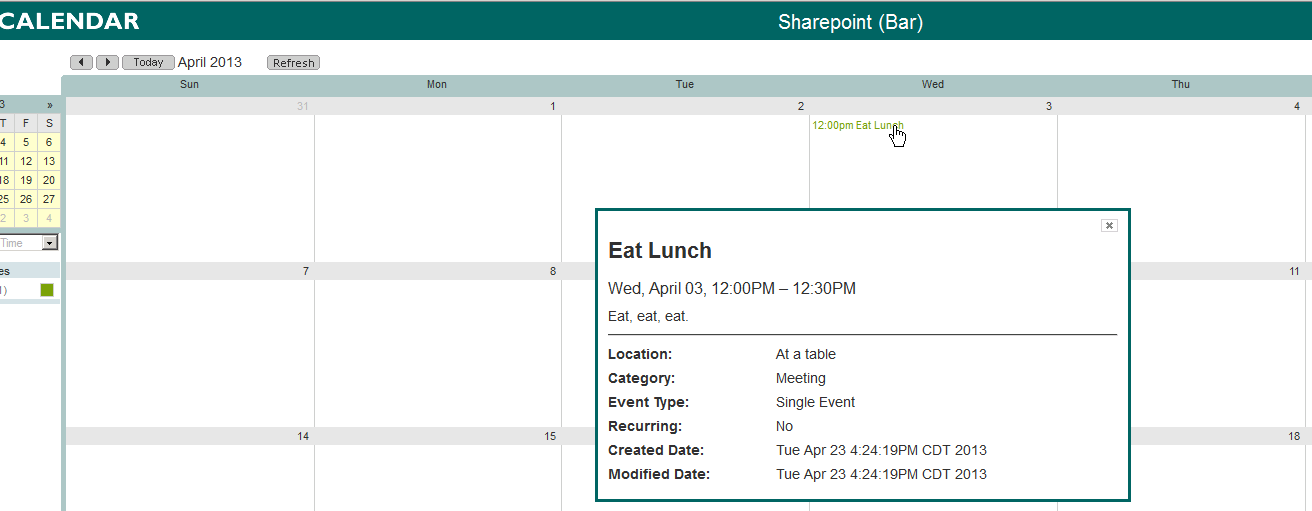
Verify that your new calendar is in the list, and then click on it.

The calendar will appear in its own new browser tab:
Updated 3 months ago
