Building Workflows
Overview
The workflow process takes over once a front-end form is submitted. The Kinetic Workflow component can retrieve and update information from numerous other systems, perform calculations using Ruby, and dynamically determine process steps.
Building a Global Workflow
Much of the workflow-building process occurs in the Global Workflow console, which you can access using the dropdown in the top left corner.
There are three methods for creating workflows:
- Directly from scratch using the Workflow Builder
- Cloning an existing workflow
- Importing a workflow from another environment
We'll first cover how to create workflows from scratch, then discuss cloning and importing.
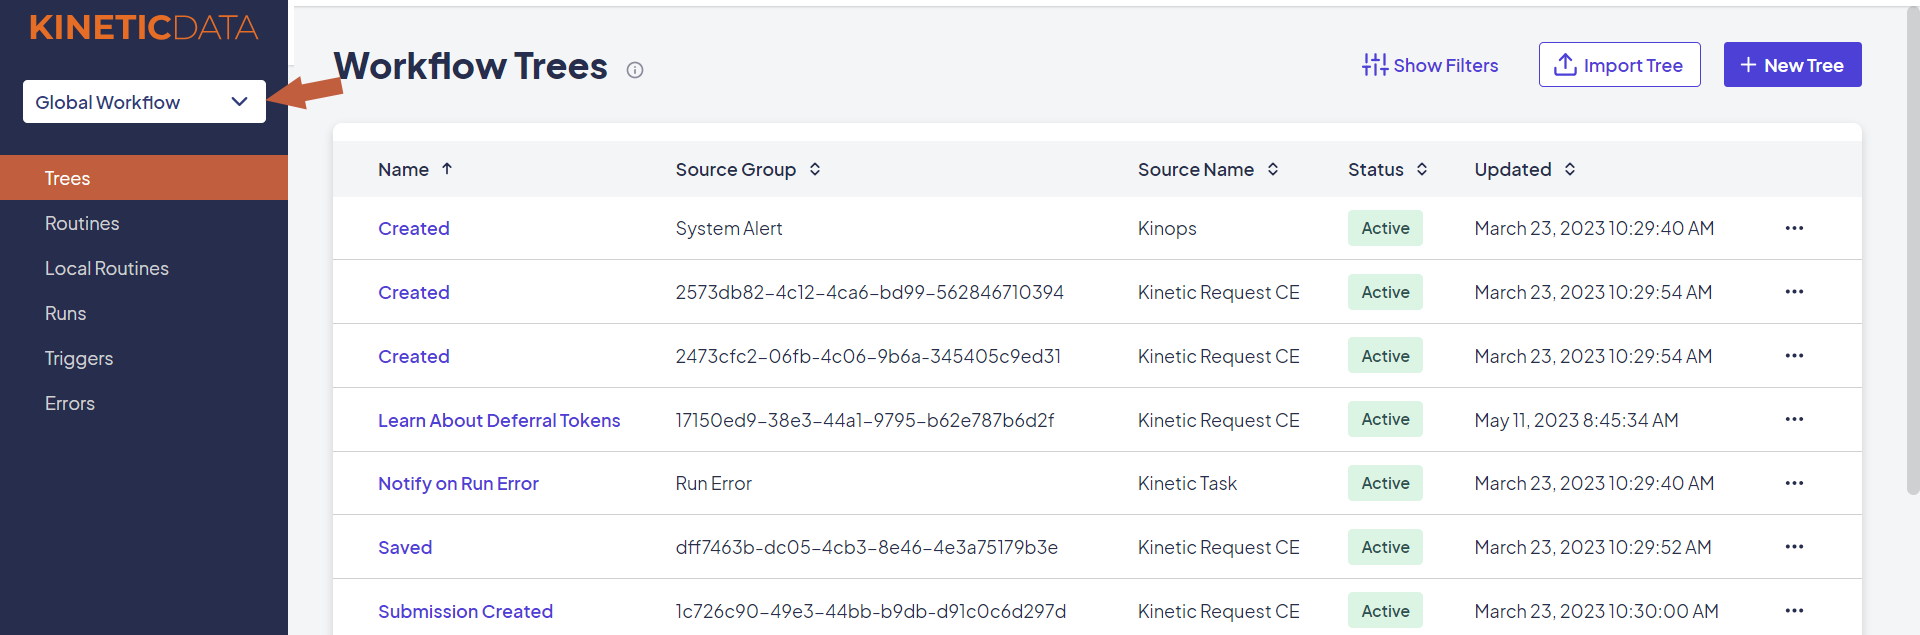
Trees
Trees are the parent process for workflow. Each tree is dependent on a source for its input. Forms, submissions, spaces, kapps, and users call trees through a webhook that creates a trigger for the tree.
Trees contain global and local handlers and routines. Trees can only be called by triggers.
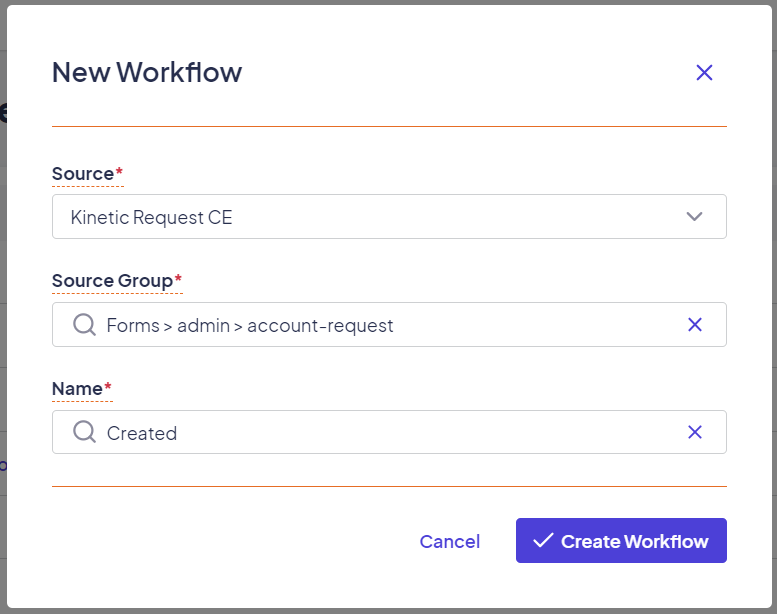
Complete the following steps to create a new workflow tree:
-
Select Global Workflow from the dropdown menu in the Space console.
-
Click New Tree.
-
Fill in the following fields:
- Source: Select the source of the record.
- Source Group: Select the category for the element you want to use with the tree. For example, if you selected a Source Group of "Submissions > queue > case-bulk", the tree would fire when a submission is made from the "Case Bulk" form in the "Queue" kapp.
- Name: Select the name you want to use for the tree. The selected Source determines name values. For example, the following names can be selected if the Source is Kinetic Request CE:
- Closed
- Created
- Deleted
- Submitted
- Updated
-
Click Create Workflow.
The Workflow Builder opens automatically after you create a new workflow tree. You can also access the Builder by clicking the workflow name on the Trees page.

Example of a workflow tree
At the top of the Workflow Builder is a panel with the following features:
- Exit Builder
 : Returns you to the Tree Details console.
 - Tree information: Displays the tree name, source, and source group.
- Save: Saves any changes made in the Builder.
- Search nodes box: Used to search for nodes within the tree.
- Run: Starts a run of the tree based on your selected inputs.
- Actions menu
 : Used to perform the following actions:
- Clone: Makes a copy of the existing tree. You'll need to name and configure the cloned tree.
- Export: Creates an XML copy of the tree information that you can download and use in other environments.
The following controls are displayed on the left side of the main Builder window:
- Zoom In
- Zoom Out
- Undo
- Redo
- Open the "Runs" tab
- Open the "Settings" tab
- Open a legend for the node icons
Tree Nodes
A node represents a task on a tree (for example, a handler that is used to retrieve users based on a search string). When you place a node of a handler in a tree, you configure that search string specific to that tree.
Deferred Nodes
Most nodes complete their function right away, and the workflow process then continues. However, a deferred node, while it still completes its function, will wait (defer) for a response before continuing on in the tree process. A common example of a deferred node is an Approval.
In addition to waiting for a response to Complete the deferred node, it can also accept periodic Updates.
The Update and Complete actions are done with Triggers, which are covered later.
Adding a Node
Complete the following steps to add a node to a tree:
- Click the plus sign (+) on the node you want the new node to come after.
- Scroll to locate the task you want to add or search for a task using the Search Task List box on the left.
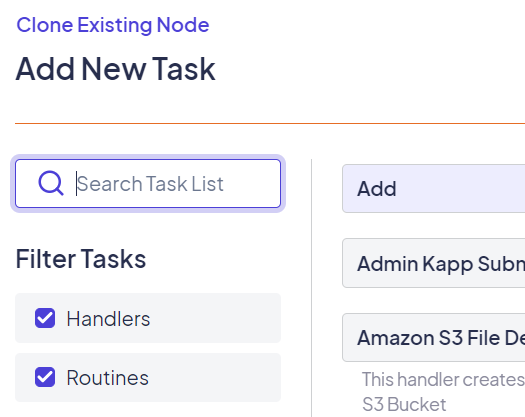
Use the Search Task List box to locate specific tasks.
- Enter a name for the new node in the Name box.
- Optionally, enter a label or a connector for the node.
- Click Next.
- Enter the parameter information for the selected node. The exact options available will vary depending on which node you are configuring. Required parameters are marked with a red asterisk (*).
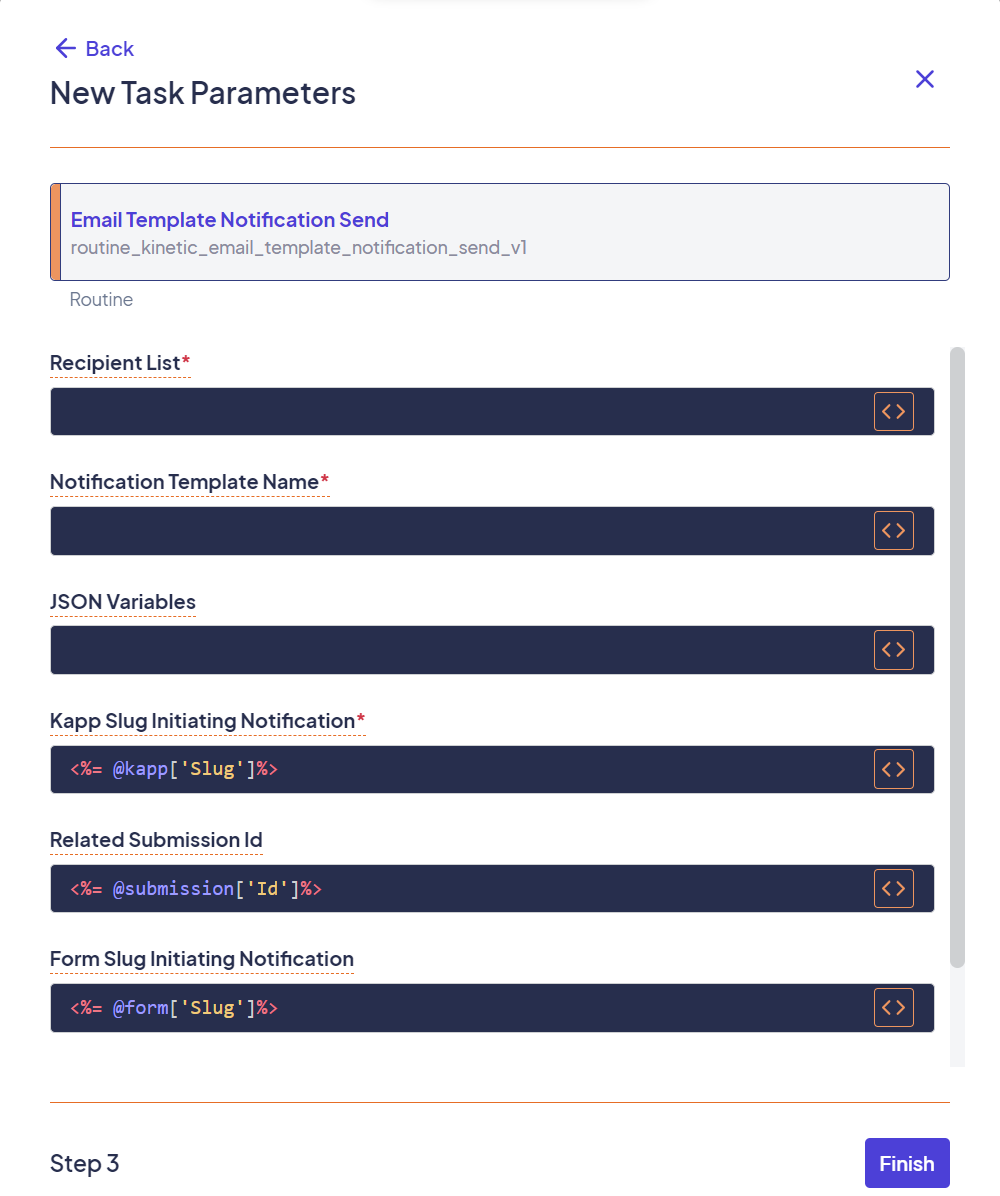
Task Parameters vary depending on the task selected
Connectors
Connectors connect nodes. They are one-way arrows that direct processing from one node to another. Connectors are configured in the same dialog as the node when it is first created, or you can click on the "funnel" symbol to update an existing connector.
Complete the following steps to create a connector:
To create a connector, click the plus sign (+) on the node you want to start from, then drag the arrow into the destination node.
Available Connector options
A single node can have more than one connector coming from it, but only joins and junctions should have more than one connector coming into the node.
The default connector type is Complete. If you create a connector between two nodes and don't make any changes, that connector will only fire when the starting node is complete. Complete connectors are displayed with solid lines.
There are two additional options for connectors: Create and Update.
- Create connectors fire as soon as a deferred node completes its function. Create connectors are displayed with dotted lines.
- Update connectors only fire when an update trigger is processed for the deferred node. Update connectors are displayed with dashed lines.
Note: If a node is not deferred, these options will not offer any additional functionality, though they still be used.
For a deferred node, a Complete connector only fires when a complete trigger is processed for the node.
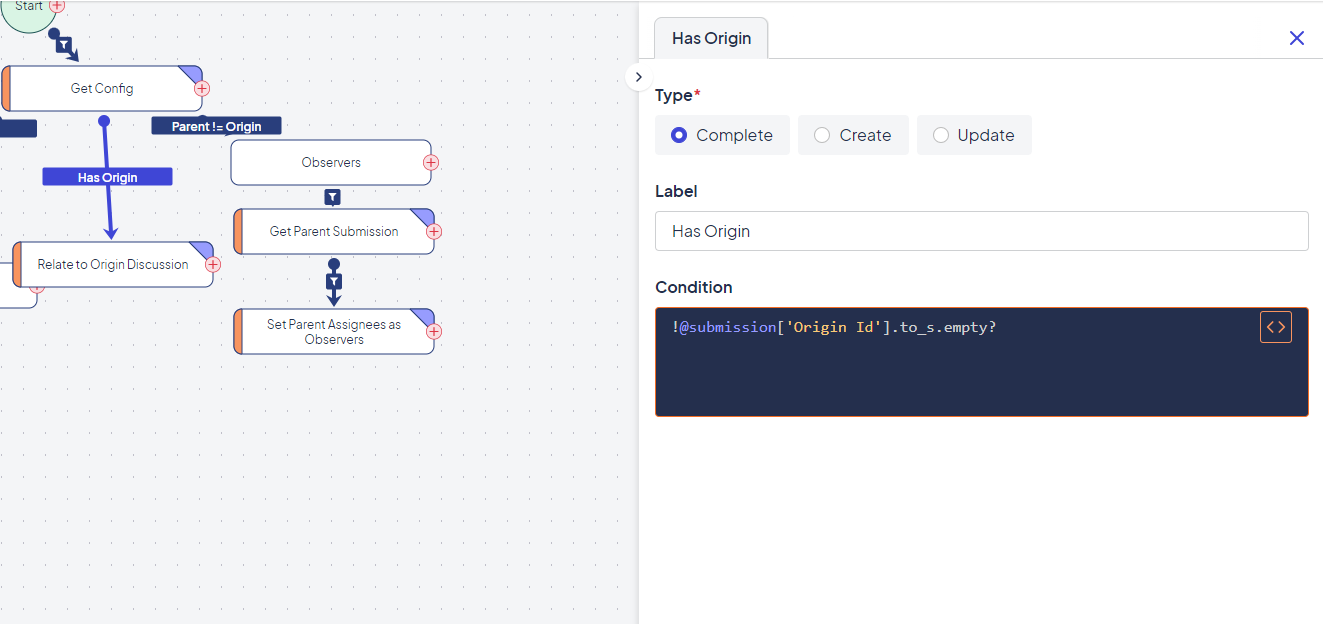
Nodes can also have qualifications. The qualification is a Ruby expression that resolves to either True (where the connector processes) or False (where it does not).
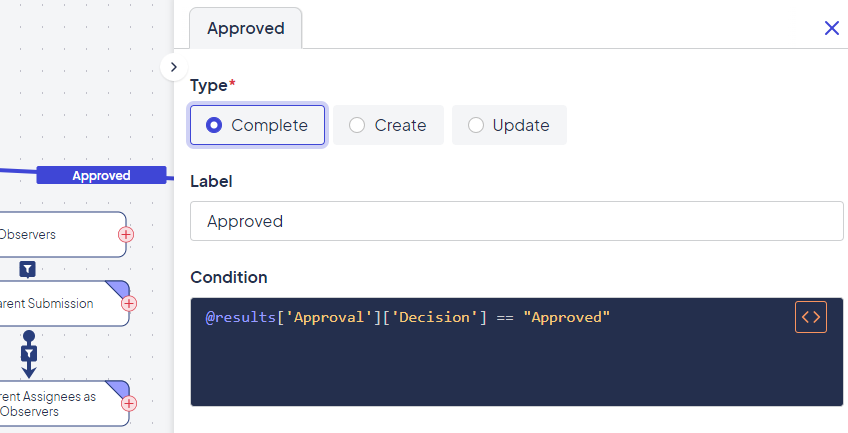
Example of a qualified connector node
Parameters
A parameter is an input of information that is passed into a task for processing. The data that gets passed into the parameter can be added in the following ways:
- As static text
- As a dynamic value that is calculated when the input is run
- As a dynamic value that was returned from a previous node
- As a combination of the above
Every task handler has its own list of parameters. Parameter options depend on the selected source and whether you're in a tree or a routine.
All parameter values use the same format. The value is made up of enclosing embedded Ruby tags (<%= %>), which tell the engine that the options will be replaced with a value from the source input. The first part between the tags begins with an @ symbol and defines where the value is coming from (such as a result, submission, or form). The second part is enclosed in square brackets ([ ]) and typically identifies a specific item for the first value.
As an example, the following parameter value tells the task engine to return the answer to the First Name question: <%= @values['First Name']%>.
Kinetic Platform Parameters
Every workflow is tied to a source: a system that initiates when the workflow should be run. The source then passes a list of parameter values when it tells the workflow to run. The following parameters are specific to the Kinetic Platform source:
- Event: An action that prompted the run. Submission events include the date and time of the submission.
- Form: Information about the form.
- Form Attributes: Access to the form’s attributes.
- Kapp: The name and slug of the Kapp.
- Kapp Attributes: Access to the Kapp’s attributes.
- Space: The name and slug of the space.
- Space Attributes: Access to the space’s attributes.
- Submission: Information about the submission, including dates and times.
- Submission Previous: Information from the previous submission. Provided only if a previous submission exists.
- Values: Answers from the submission.
- Values Previous: Answers from the previous submission. Provided only if a previous submission exists.
Creating Workflows at Other Levels
You can also build workflows at the Space, Kapp, or form levels. The process for each is very similar to creating a global workflow.
- Access the New Workflow option from the Space, Kapp, or form level:
- Space level: With "Space" selected in the dropdown menu, select Build > Workflow, then click New Workflow.
- Kapp level: With the desired Kapp selected in the dropdown menu, select Build > Workflow, then click New Workflow.
- Form level: With the desired Kapp selected in the dropdown menu, select Build > Forms, select the desired form, then select Workflow > New Workflow.
- Enter a name for the workflow in the Workflow field.
- From the Event list, select the event you want the workflow to use to trigger.
Note: If you are creating a workflow at the Space level, the event selected will trigger for any Kapp in the Space. For example, while Spaces do not have submission records, selecting an event of "Submission Submitted" will cause the workflow to fire whenever a submission in any Kapp is submitted.
- Click Create Workflow.
Cloning a Global Workflow
There may be times when it's beneficial to copy an existing workflow and make minor edits instead of creating a largely similar workflow entirely from scratch. One way to accomplish this is by cloning the original workflow and making the necessary changes.
Follow these steps to clone a workflow:
- From the Tree page, locate the workflow you want to clone and select Actions > Clone.
- In the Clone Tree dialog, enter a new name for the tree, then select the new name in the Custom Option box.
- Click Clone
- The Workflow Builder will open for the cloned tree. Make any necessary changes, then click Save.
Importing a Global Workflow
Importing workflows is typically done when you have workflow functionality in one Space that you would like to have in a different Space.
Follow these steps to import a workflow:
- From the Tree page of the source Space, locate the workflow you want to copy and select Actions > Export.
- From the Export Tree dialog, either:
- Click Download and save a copy of the .xml file.
- Click Copy at the top right of the dialog to copy the tree .xml.
- Go to the Tree page of the Space where you want to import the tree.
- Click Import Tree, then do one of the following:
- If you downloaded the .xml file, drag and drop it into the Import Tree dialog or click Browse to search for the file manually.
- If you copied the .xml text, click by Tree XML and paste the text into the dialog.
- Click Import.
URL Import
Along with the methods described above, you can import a workflow tree directly from its .xml URL. To do so, from the Tree menu of the Space where you want to import the tree, click Import Tree, then select by Tree XML. Enter the URL of the tree you want to import, then click Import.
Updated about 1 year ago