Creating Your First Integration
Connecting to Kinetic Data's API with an Integration
To make your forms dynamic and your workflows intelligent, you’ll often need to connect to external systems or even to Kinetic itself.
In this example, you’ll create your first integration using the Kinetic API to retrieve a list of Teams from your Space. This is the same data you created in the previous module when you defined departments like Human Resources, Sales, and IT.
We’ll first create a Connection that knows how to authenticate and communicate with Kinetic’s internal API. Then, we’ll define an Operation that fetches just the Teams we care about (those under the Departments parent).
Why This Matters
- You’ll use this integration to populate the Department dropdown on your onboarding form so users can select from actual Teams in your system.
- Later, your workflows will use the selected Team to look up attributes (like a manager email) and automatically route approvals — no manual assignments required.
This is your first step toward creating a truly flexible, data-driven experience inside the Kinetic Platform.
Creating a Kinetic Integration
Now that you understand why this integration matters, let’s walk through how to build it.
In Kinetic, an Integration is made up of two parts:
- A Connection defines how Kinetic connects to an external system (or to itself), including authentication and base URL.
- An Operation defines what action Kinetic will take, such as retrieving data or sending a request, and how to format the input/output.
In this case, you’ll be connecting to Kinetic’s own internal API to retrieve a list of Teams under a specific naming pattern: Departments::.
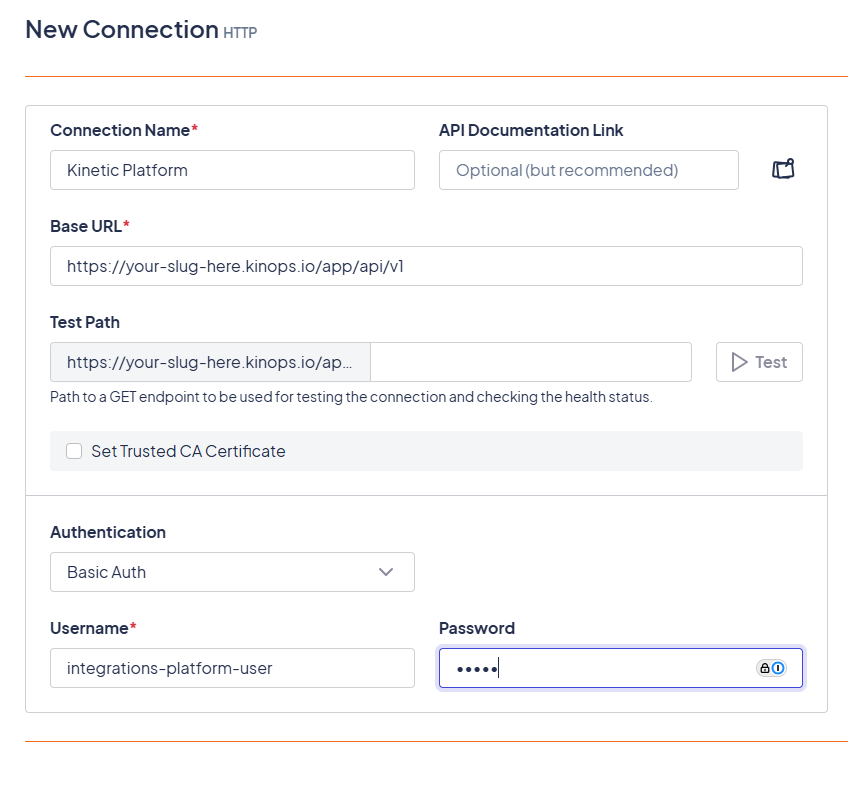
Step 1: Create the Connection
The Connection defines:
- Where to send the request (Kinetic’s internal API)
- How to authenticate (For this exercise, we will be using Basic Auth)
To create the connection:
- Navigate to Configuration > Plugins from the Space Console
- Click + New Connection
- Select HTTP
- Enter the following values:
- Connection Type:
Fetch Teams - Base URL:
https://<your-kinetic-instance>/app/api/v1 - Authentication Method: Basic Authentication
(Use a dedicated integration user to avoid password-related outages.)
- Connection Type:
- Click Create Connection
Tip: Avoid using personal credentials. Create a user specifically for integrations to make long-term maintenance easier.
See An Example
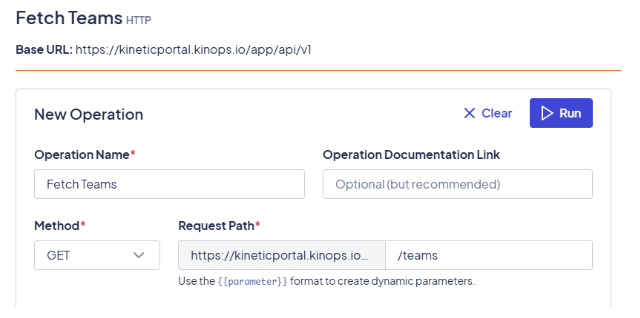
Step 2: Create the Operation
Now that the connection is defined, you'll create the Operation that fetches the Teams.
To create the operation:
-
Open your
Fetch Teamsconnection -
Click + Add Operation
-
Use the following settings:
- Operation Name:
Fetch Teams - Method:
GET - Request Path:
/teams
- Operation Name:
-
Add a URL Parameter to filter for only department-level teams:
- Key:
q - Value:
name=*"Departments::"
- Key:
-
Define the Output, which is how the data will be structured and used in forms:
- Output Key:
Departments - Output Value:
body.teams
- Output Key:
-
Click Save Operation
See An Example
Step 3: Test the Operation
Once saved, click Test Operation to make sure it's returning the expected data. You should see results of a list of Teams under Departments::like this:
{
  "teams": [
    {
      "name": "Departments::Human Resources",
      "slug": "human-resources",
      "attributesMap": {
        "Manager": ["[email protected]"]
      }
    },
    ...
  ]
}
Connect the Integration to Your Form
Now that your integration is set up and returns a list of Teams, it's time to connect it to your form.
In this step, you'll update the Department field in your Onboarding Request Form to use the integration you just built. This will allow the dropdown to display real Teams pulled from your Kinetic Space with no manual updates required.
Step 1: Open the Onboarding Request Form
- From the Space Console, navigate to:
Kapps > Onboarding > Forms - Click on Onboarding Request Form
- Locate the Department field and click Edit
Step 2: Set the Choices Data Source
- In the field editor, change the Choices Data Source to
Integration - Click + Add a New Integration
Then type in the following:
- Name:
Fetch Teams - Connection:
Fetch Teams(This will show up in a dropdown) - Operation:
Fetch Teams(This will show up in a dropdown)
Click Save to attach the integration to the field.
Step 3: Configure Display & Submission Values
Now that the integration is connected, you’ll define what the user sees in the dropdown and what value gets stored when the form is submitted.
Choices Integration List Property
- Select:
Departments
(This matches the Output Key from your integration.)
Choice Label Expression
There is some code you will want to enter to make the dropdown appear a little cleaner. We do not need the options to look like Departments::IT. Instead, we want the dropdown to only show IT
- Choice Label:
${integration('name').split('::')[1]} - Choice Value:
${integration('slug')}
See An Example
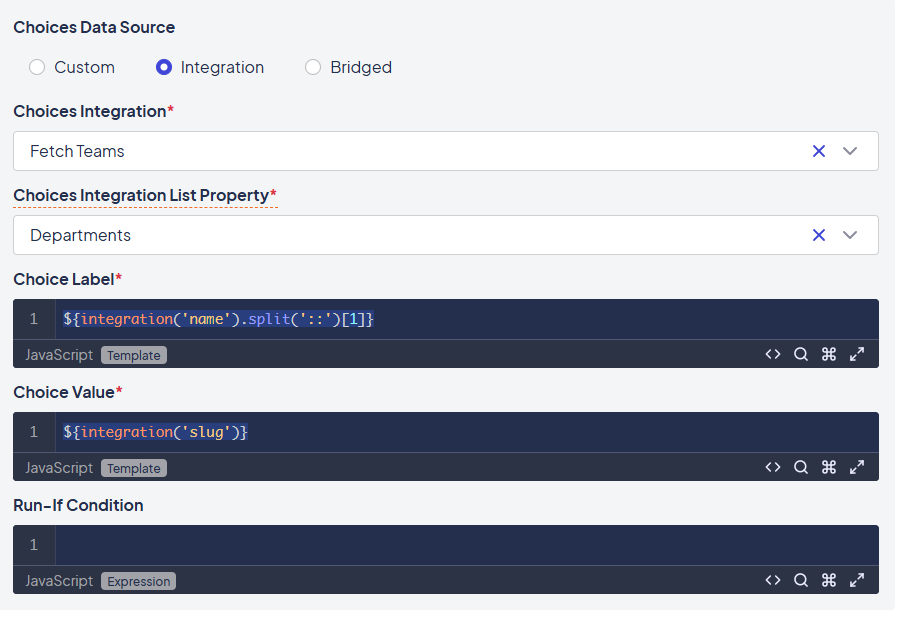
Click Save when finished.
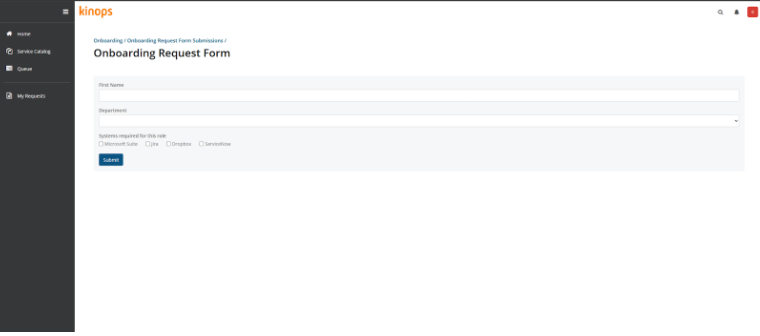
Step 4: Preview and Test
- Click Preview on the form
- Open the Department dropdown
- You should now see a list of department teams (e.g., Human Resources”, “Sales”, etc.)
Any new Team added under Departments will automatically appear in this dropdown moving forward — no need to manually update the form.
See An Example
Getting an error message?You might have a syntax issue. Many errors during training are due to copy/paste problems that miss key characters.
Don't just copy and paste the code snippets.
Typing them out yourself helps ensure proper formatting and gives you a better understanding of the syntax.
Recap
By completing this module, you’ve:
- Connected your form to live Team data using an integration
- Configured the
Departmentfield to display and store real Team values - Created a dynamic dropdown that automatically stays in sync with your Kinetic Space
This not only saves you from manual form edits, but also unlocks dynamic routing in your upcoming workflows.
Expand Your Knowledge
Want to go deeper? Here are a few related topics you might find helpful:
Next up: Building Your First Workflow — you'll take the Team selected in your form and use it to route an approval dynamically to the right person.
Updated 8 months ago