Navigating the Workflow Builder
Navigating the Workflow Builder
The Workflow Builder is where you visually design and configure your workflow logic, whether it’s for a form, kapp, space, or global tree.
This guide walks through the layout, key tools, and tips for efficiently building and managing your workflows.
Layout Overview
When you open a workflow, you'll see three main areas:
- Top Toolbar: Actions and metadata for the workflow
- Canvas Area: Where you build the tree (nodes and connectors)
- Left Sidebar: Tools for navigation, node filtering, and history
Top Toolbar Features
| Feature | Description |
|---|---|
| Exit Builder | Return to the workflow details page |
| Workflow Info | Displays tree/workflow name, source, and group |
| Save | Save current changes to your workflow |
| Search Nodes | Quickly find a node by name |
| Run | Execute the workflow manually (useful for testing) |
| Actions Menu | Clone or export the current workflow tree |
Actions Menu Options
Click the Actions (three-dot) menu in the top toolbar to access:
- Clone: Duplicate the workflow tree
- Export: Download the workflow in XML format for backup or reuse
Canvas Tools (Left Sidebar)
| Tool | Description |
|---|---|
| Zoom In / Out | Adjust view scale of the workflow |
| Undo / Redo | Revert or re-apply recent changes |
| Runs Tab | View execution history and debug info |
| Settings Tab | View or update metadata for the workflow |
| Legend | Shows visual indicators used for node types and connector styles |
Working with Nodes
Adding a Node
- Click the + on the node you want to follow.
- Use the Search Task List or scroll to browse available options.
- Select a Routine, Connection Operation, or Handler.
- Configure any required parameters and click Finish.
What Node Colors Mean🟩 Connections/Operations have a green bar
🟧 Routines have an orange bar
⬜ Handlers appear as standard buttons
Editing a Node
- Click on the node in the canvas
- Edit parameters or labels in the modal
- Save changes when finished
Node Types: Handlers, Integrations, and Routines
When adding a node to your workflow, you’ll choose from one of three types:
| Node Type | Description |
|---|---|
| Handlers | Core system tasks that include default functionality like creating submissions, sending emails, or starting approvals. |
| Integrations | External system operations are defined in the Connections & Operations framework (e.g., Create Zendesk Ticket, Lookup from AD). |
| Routines | Custom-built logic blocks that are reusable across workflows. You define them under Build > Workflow > Routines at the Space level. |
Handlers: Built-In Tasks
Handlers are the foundational building blocks of Kinetic workflows. They are prebuilt Ruby scripts that perform tasks like:
- Creating or updating submissions
- Starting deferred approvals
- Triggering workflows or webhooks
- Sending email or HTTP requests
- Performing data transformations
Some handlers are deferred, which means the workflow will pause after the handler runs and wait for a response (e.g., an approval or form completion).
You can find handlers by name or category in the task list when building a workflow. They're a great starting point for process steps that don’t require external integration or custom logic.
Working with Connectors
Connectors define the flow from one node to the next.
Creating a Connector
- Click the + on a node
- Drag the arrow to the destination node
Connector Types
| Type | Style | Description |
|---|---|---|
| Complete | Solid line | Fires when the previous node completes successfully |
| Create | Dotted line | Fires when a deferred node is created (e.g., approval started) |
| Update | Dashed line | Fires on update triggers to a deferred node (e.g., approval reminder) |
Deferred nodes (like Approvals) support all three types. Standard nodes typically use only Complete.
Adding a Qualification
You can gate a connector based on conditions using embedded Ruby.
Example:
<%= @values['Request Type'] == 'Remote' %>If this returns true, the connector will activate.
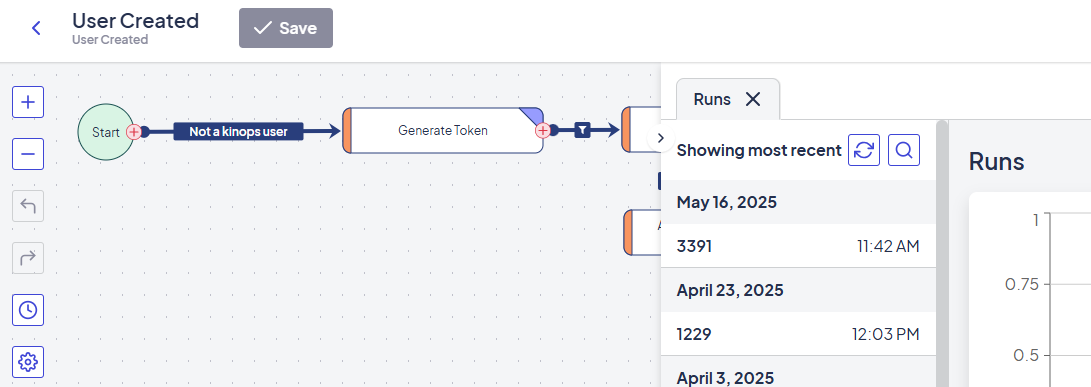
Debugging with the Runs Tab
The Runs Tab (represented by a small clock on the left-hand side) lets you see:
- Execution history for the workflow
- Status and errors for each run
- Inputs and outputs for each node
Use this to troubleshoot failed processes or review logic.
Tips for Effective Building
- Use Routines to avoid duplicating logic across workflows.
- Name your nodes clearly (e.g., “Send Approval Email” vs. “SMTP Handler”).
- Test early and often with the Run button.
- Use qualifications to keep logic flexible and dynamic.
What's Next?
Updated 8 months ago